Sunday, 7 July 2013

Chicken Care: Chicken Coop Maintenance and Beddings


Cleaning

Regular cleaning is important if you want healthy, happy hens. This can be anything from a daily, weekly, monthly or yearly clean, depending on how many bird you keep, the coop and the system you use.

Cleaning out the chicken house is something that puts off quite a few people from raising chickens; but it needn't be such a burden!
However, once a year, the whole coop will need hosing down and disinfecting with a mild bleach solution or poultry disinfectant.

Here are a few of the most popular systems for cleaning and are fairly economical.

The Deep Litter System.
This system is most frequently used with large numbers of hens, and large coops. Instead of cleaning the droppings out, you just add new bedding over the top, stopping the hens from treading on it. Make sure you have plenty of ventilation for this system, and clean the whole thing out once a year. Long straw doesn't work for this as the moisture runs through. This system works best in winter, providing extra heat on cold nights.

Spot Cleaning.
I currently use this system because my coop is relatively small and I currently only have a few hens. You will need a small trowel or scoop. Scoop the droppings out daily or every few days. Again, long straw can be used but is not too suitable because it is difficult to scoop out the dropping without taking all the bedding with you! This system is good for composting because you add a little bedding with plenty of manure to the compost heap every few days or it can be added straight on to the garden.

Regular Cleaning.
It is possible to give a good layer of bedding and change it all weekly to monthly. I usually use this if I go away so my "hen sitter" doesn't need to clean them out much, if at all. Not the best system if the perches are near the door, because the hens will have to walk through the droppings to get into the coop.

Bedding


Type:                                                             Pros &Cons:                                                                          

Long Straw - This can be quite cheap if you buy in large bales from a farm, however you will need to be extra careful of mites and lice. Red mites may also hide inside the straw. It is not the most absorbent litter, and can not be used for spot cleaning. Good insulator and great for composting or mulching. I have heard from a couple of sources that it can cause crop impaction, but very rare. Hens like it in the nest boxes.

Chopped Straw - Better absorbency than long straw and can be used for spot cleaning. Mites may still hide in it but it's much less likely. Despite it's disadvantages, I have used this for years, and found it perfectly adequate. Can be insulating, and great for composting and mulching. 

Oilseed Rape Straw - I didn't even know this existed until recently, but I am completely converted! It  smells nice, can be composted, very absorbent, insulating, if chopped, great for spot cleaning and dust-free. It's also one of the cheapest and most economical beddings.

Hay - Can harbour fungi, but if replaced regularly and kept dry, works OK, good for nests but don't use for chicks or broody hens. Not the best absorbency, not good for spot cleaning.

Hemp - Hemp bedding, such as Aubiose, is good to use. Sorry, I have never used it for chickens, but sources say it works well, with good absorbency and dust-free.

Woodshavings - Best if dust extracted. Very dusty shavings should not be used. Needs a lot longer to rot down than  the other beddings I have talked about, so will need to be in a separate compost heap. Very absorbent and great for most cleaning systems (see above).  

Sand - Absorbency OK, not good for composting but can be reused by sieving the sand through and using the droppings on the compost heap. Not at all insulating. 

Leaves, bracken, etc. - Some people do use these as bedding. Can't give an opinion on dried leaves, but bracken is a good insect repellent and used to be frequently used in the olden days, but apparently should not be consumed by the chickens, so I wouldn't risk it!

Newspaper - Not very good absorbency, and there is some debate about whether the ink is bad for them. Good insulator.


Wednesday, 12 June 2013

Chicken Care: Feed

One of the most important aspects of responsible chicken keeping is clean, fresh food and water.

There are many different feed types, and they all have their advantages and disadvantages. I'll list as many as I can here, but you may want to do further research elsewhere. The following feeds are the most commonly found and popular, and I believe you can find them in both the UK and US, if not other countries too.

Bonnie and Daffy help  themselves to pellets.
Credit: birdbrain99 (author)

Pellets - Probably the most popular feed, I use this for my birds. It should contain at least 16% protein for healthy, laying hens. Layer's Pellets provide most of the essential ingredients to keep your hens healthy whilst laying. Layer's Pellets should only be used after 18-25 weeks of age, or when the first egg is laid. Before that, Grower's pellets should be given. You should not feed grower's pellets to laying birds, either. If you have cocks and hens, layer's pellets are fine to feed to all of them.

Mash - This is quite a popular option too. Basically it is the same as pellets, but it has not been compressed into pellets. It is finely ground into lots of bits or a powder. If you don't have much space for your chickens, this will stop them getting quite so bored as it takes longer to eat than the same amount of pellets. However, I don't feed it often to my hens because of a beak problem one has. She finds pellets easier to eat.
You can mix mash with a little water to make a kind of paste but if you do you will need to change it a couple of times a day so that it doesn't go sour. My hens adore it though, so I just give it as a healthy treat sometimes! You can leave it dry, but depending on how fine it is the chickens may be able to pick out their best bits.

Mixed corn (also known as "Scratch") is a great treat.
Credit: birdbrain99 (Author)
Mixed Corn - This is best not fed as their main feed, but it can be given in small quantities scattered on the
ground or in straw where the chickens will be able to
scratch around for it, keeping them active and preventing them from becoming bored. I tried mixing it in with the chickens' pellets,  but they just chucked all the pellets out of the hopper, so I was basically feeding them corn and wasting a lot of good food! So it is best to choose another feed and just use corn as a supplementary feed.

Oats - These must not contribute a main part in you chickens' diet as oats have hardly any nutritional value and your birds can run fat. I only feed as a very occasional treat and in the morning in winter when I scatter some down with the corn when the birds need the extra energy to keep warm.

Chick Crumbs - It is especially formulated for chicks and should not be fed after this stage.

Extras - Your hens will enjoy kitchen scraps, but this shouldn't be a main part in their diet. Make sure there is not a high sugar or salt content. They will love lettuce and salads but if you notice that their droppings look runny they could be eating too much greens or other foods so limit these, and if you notice that a certain food is having a negative effect on your chickens' health stop feeding it. There are many lists available on safe foods for chickens on the internet and in books, so please do your research before feeding. This article is a great starting point! As a rule, don't feed chicken scraps that are mouldy, off, or you wouldn't be ok about eating yourself.
If your hens are not free range then they will enjoy a bit of grass just make sure you cut it very small as it can cause Crop Impaction. It is advised not to feed grass cuttings from petrol lawn mowers.

Grit - This is not strictly a "feed", but should always be available. They use grit in their digestive system to help grind up the food. Oyster Shell grit should also be available, as it is an important source of calcium. You can by these online or at poultry/farm shops. If your hens are free-range they are unlikely to need normal grit, as they will probably find enough around, but Oyster Shell grit should still be provided.

How much will a chicken eat a day?
The average hen will eat about 110 - 150 grams a day, but it depends very much on the breed, where they live, the season, etc.

How often do I need to clean the feeder, and what do I use?
Clean out the feed hopper/trough immediately if it gets soiled or you notice any algae or mould.  If not, every month or so. Use a safe poultry disinfect, and follow the instructions on the label carefully. Otherwise, you can use an ecological washing up liquid and rinse well.

Where should the feed be placed, and when should I feed the chickens?
The hopper should be placed in a dry, sheltered and light area, where the chickens can access it easily. It is best if they have their main feed available at all times, but treats, corn, etc. can be given when you like (as long as it's not enough to fill them, preventing them from eating their main feed) and as long as you've established a good routine.


Hand feeding is one of the best ways to tame chickens!
Credit: birdbrain99 (Author)
  • Do not use feed after the best before end date.


  • Store the chicken feed in a cool, dry place.


Monday, 10 June 2013

My hens relaxing in the Summer Sunshine!

Although a chilly start to the year, June has brought warmth and Sun! Here's a video of them enjoying the Summer days:D Bonnie (my Light Sussex) even tucks her head under her wing, she is so relaxed!

Note: Best not to view full screen because it is very pixelated!

Monday, 3 June 2013

Chickens: Top 5 best egg-laying pure breeds

If you are looking for ideas on which chicken breeds are best for you, one of the first questions you should ask yourself is, "do I want chickens for eggs, meat, pets or some other reason (showing, breeding, etc.)?"
If you are looking for eggs, then I have put together a list of five pure breeds that might be right for you. Please remember, these do not include Hybrids, which often lay more eggs, but have a shorter life span and don't have such a wide range of colours. This is only pointing out the five best pure breeds. I haven't written an article about the best hybrid egg-laying breeds yet.


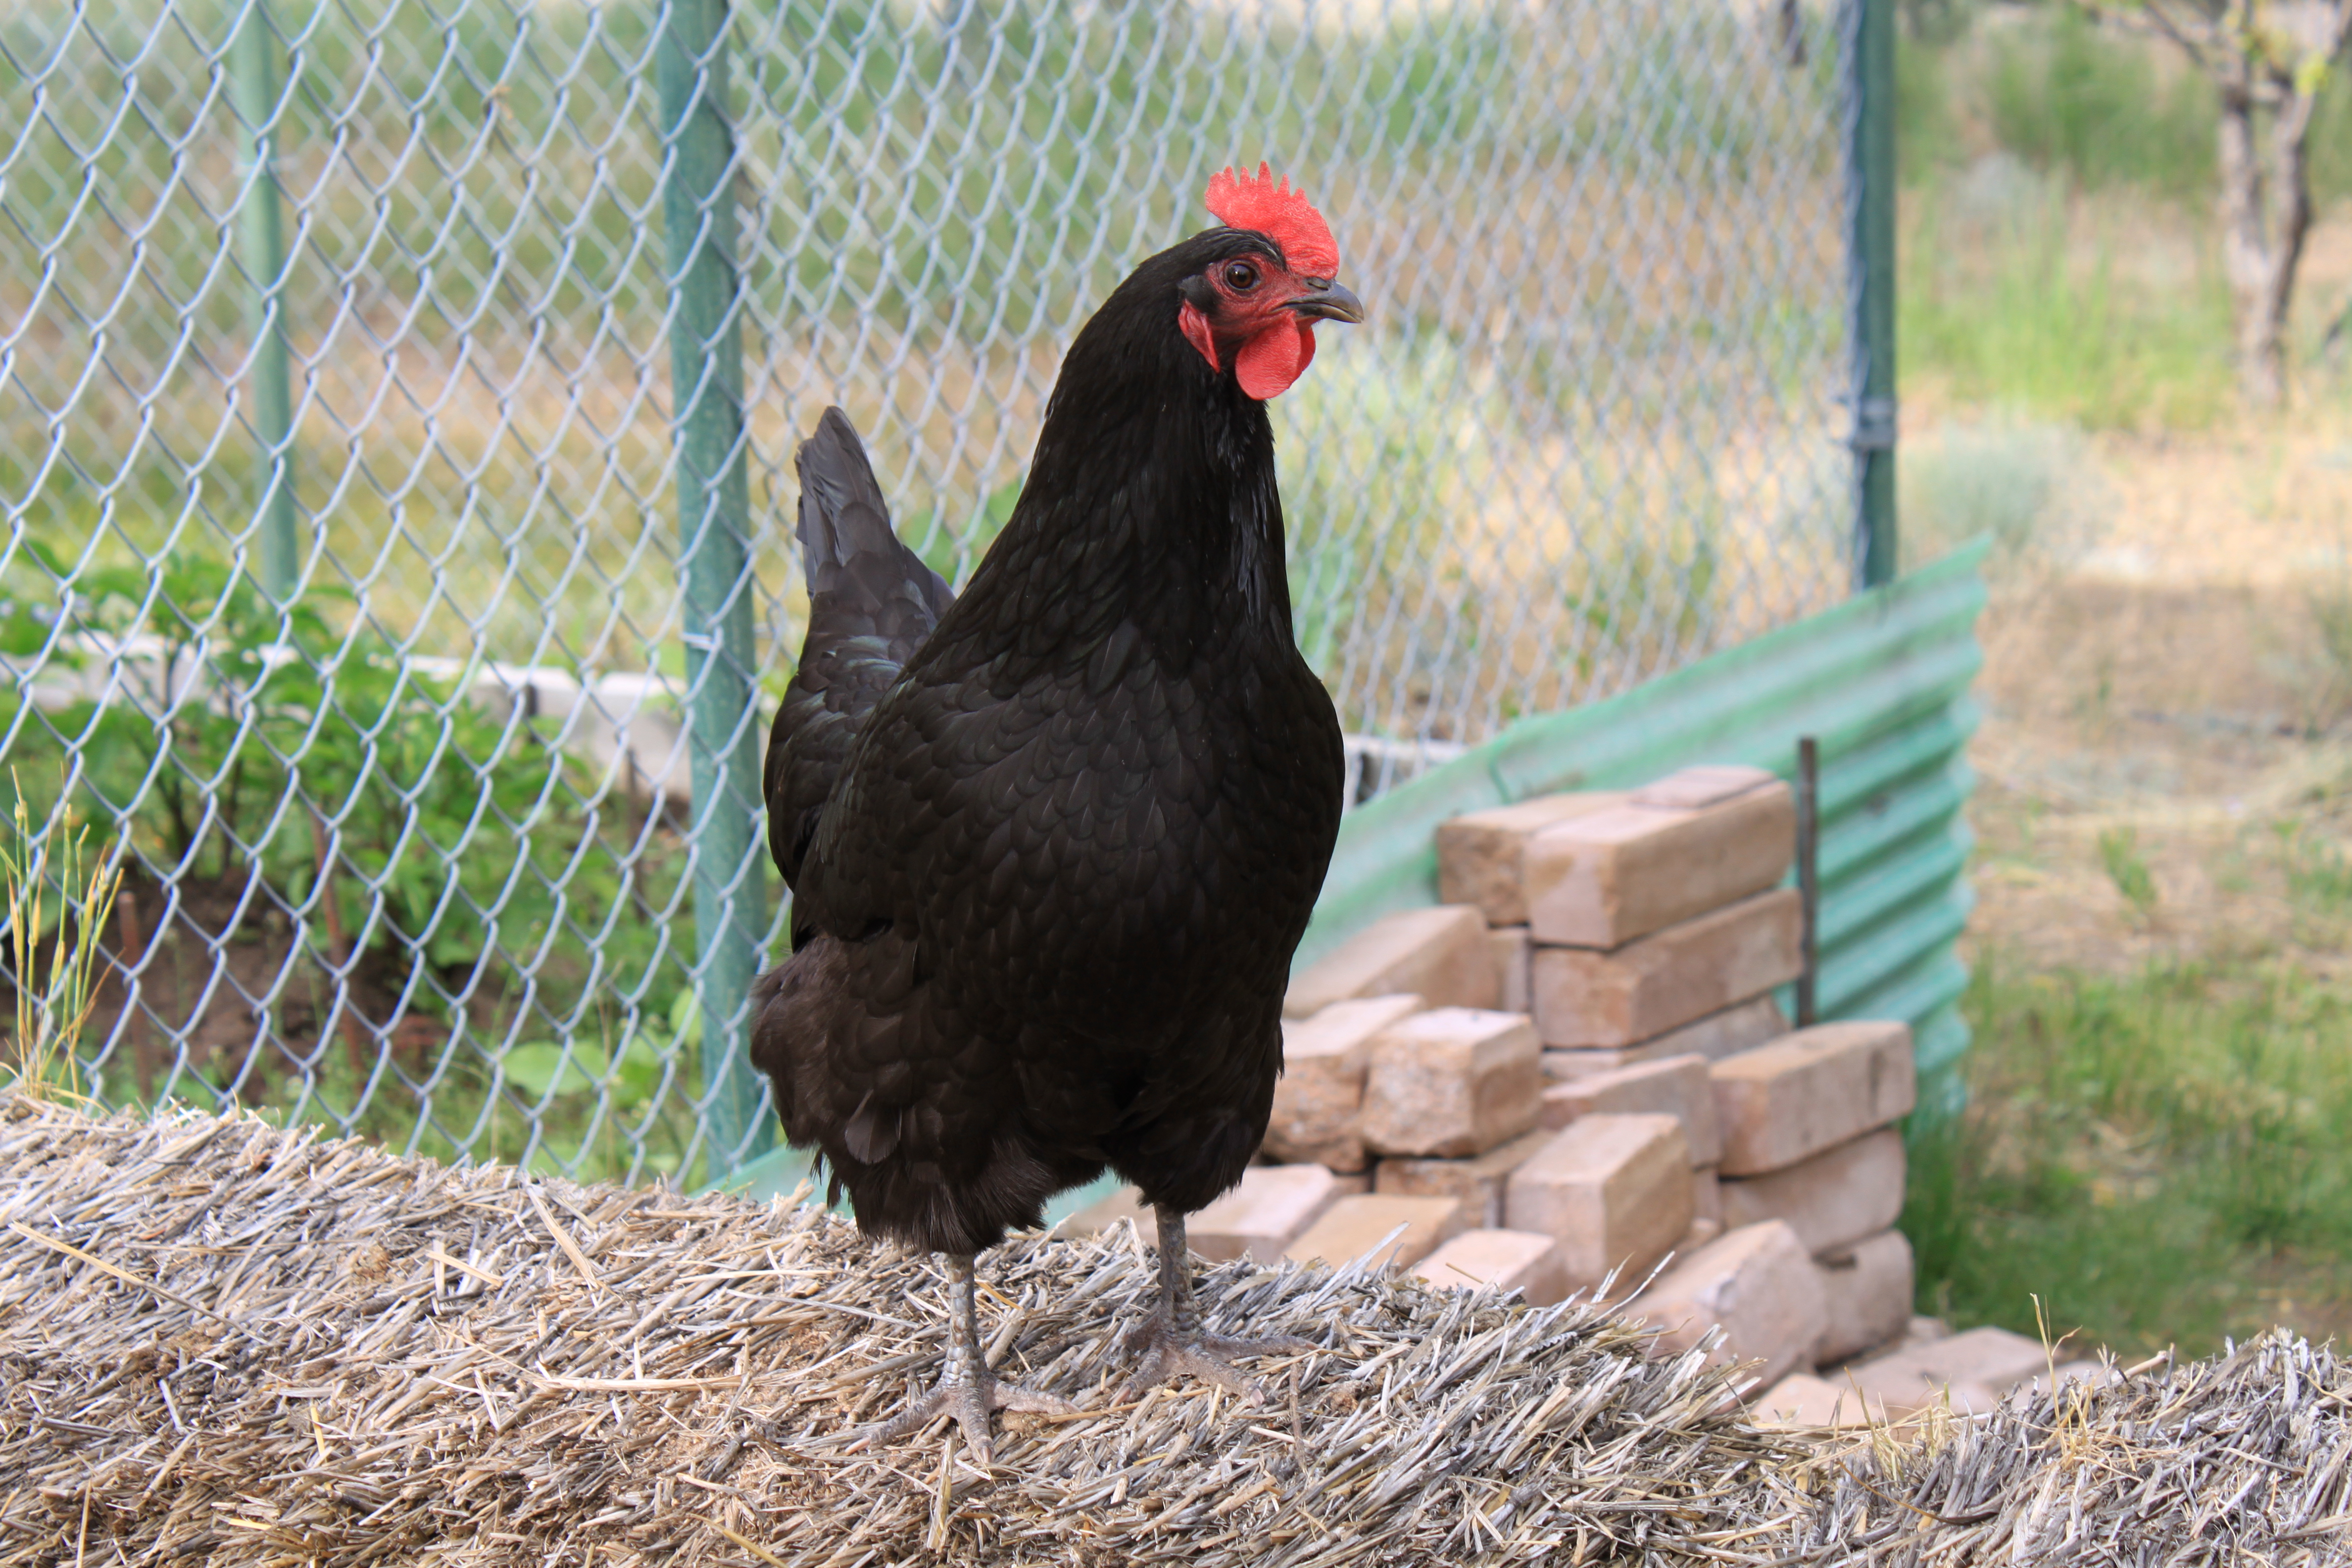
Austrolorp hen.
Credit:  Jason buildakicker Permission: CC BY-NC-SA 2.0


Austrolorp

Eggs: young hens will lay an average of 200 eggs year, but a hen was recorded in Australia and managed to lay 364 eggs in 365 days! The eggs are light brown in colour.

Personality: A generally docile, tame breed, often happy to be handled and curious. Good mother and broody.

Care: They are very easy to keep, and love to forage but happy enough if kept busy in relative confinement.


Rhode Island Red hens.
Credit: Sammmydavisdog Permission: CC BY 2.0

Rhode Island Red                                                 

Eggs: An average of 200 large brown eggs a year.

Personality: Calm, easy to tame birds, they make an ideal backyard chicken!

Care: Very easy to keep and are adaptable. They are not good broodies but are hardy.


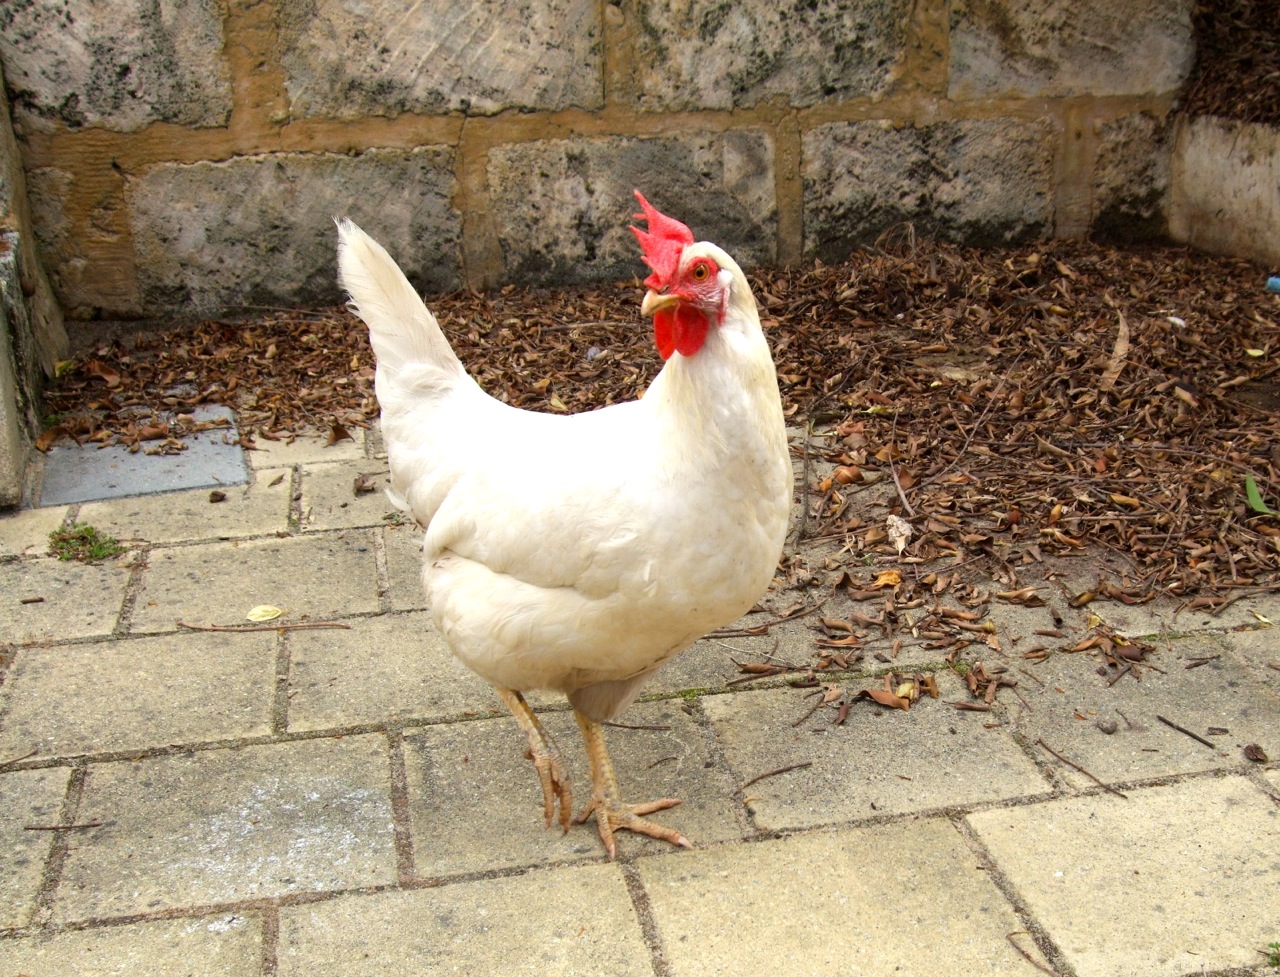
White Leghorn.
Credit: Lauredhel Permission: CC BY-NC-ND 2.0
Leghorn

Eggs: 200 + white eggs a year, depending on strain. Utility strains (particularly the White leghorn) lay more. The white leghorn is often used in the US in battery farms.

Personality: They are a Mediterranean breed so are flighty and excitable but some can be tamed and have hilarious characters if you manage it!

Care: Keep an eye on their combs in winter as they can get frostbite. They are good fliers.


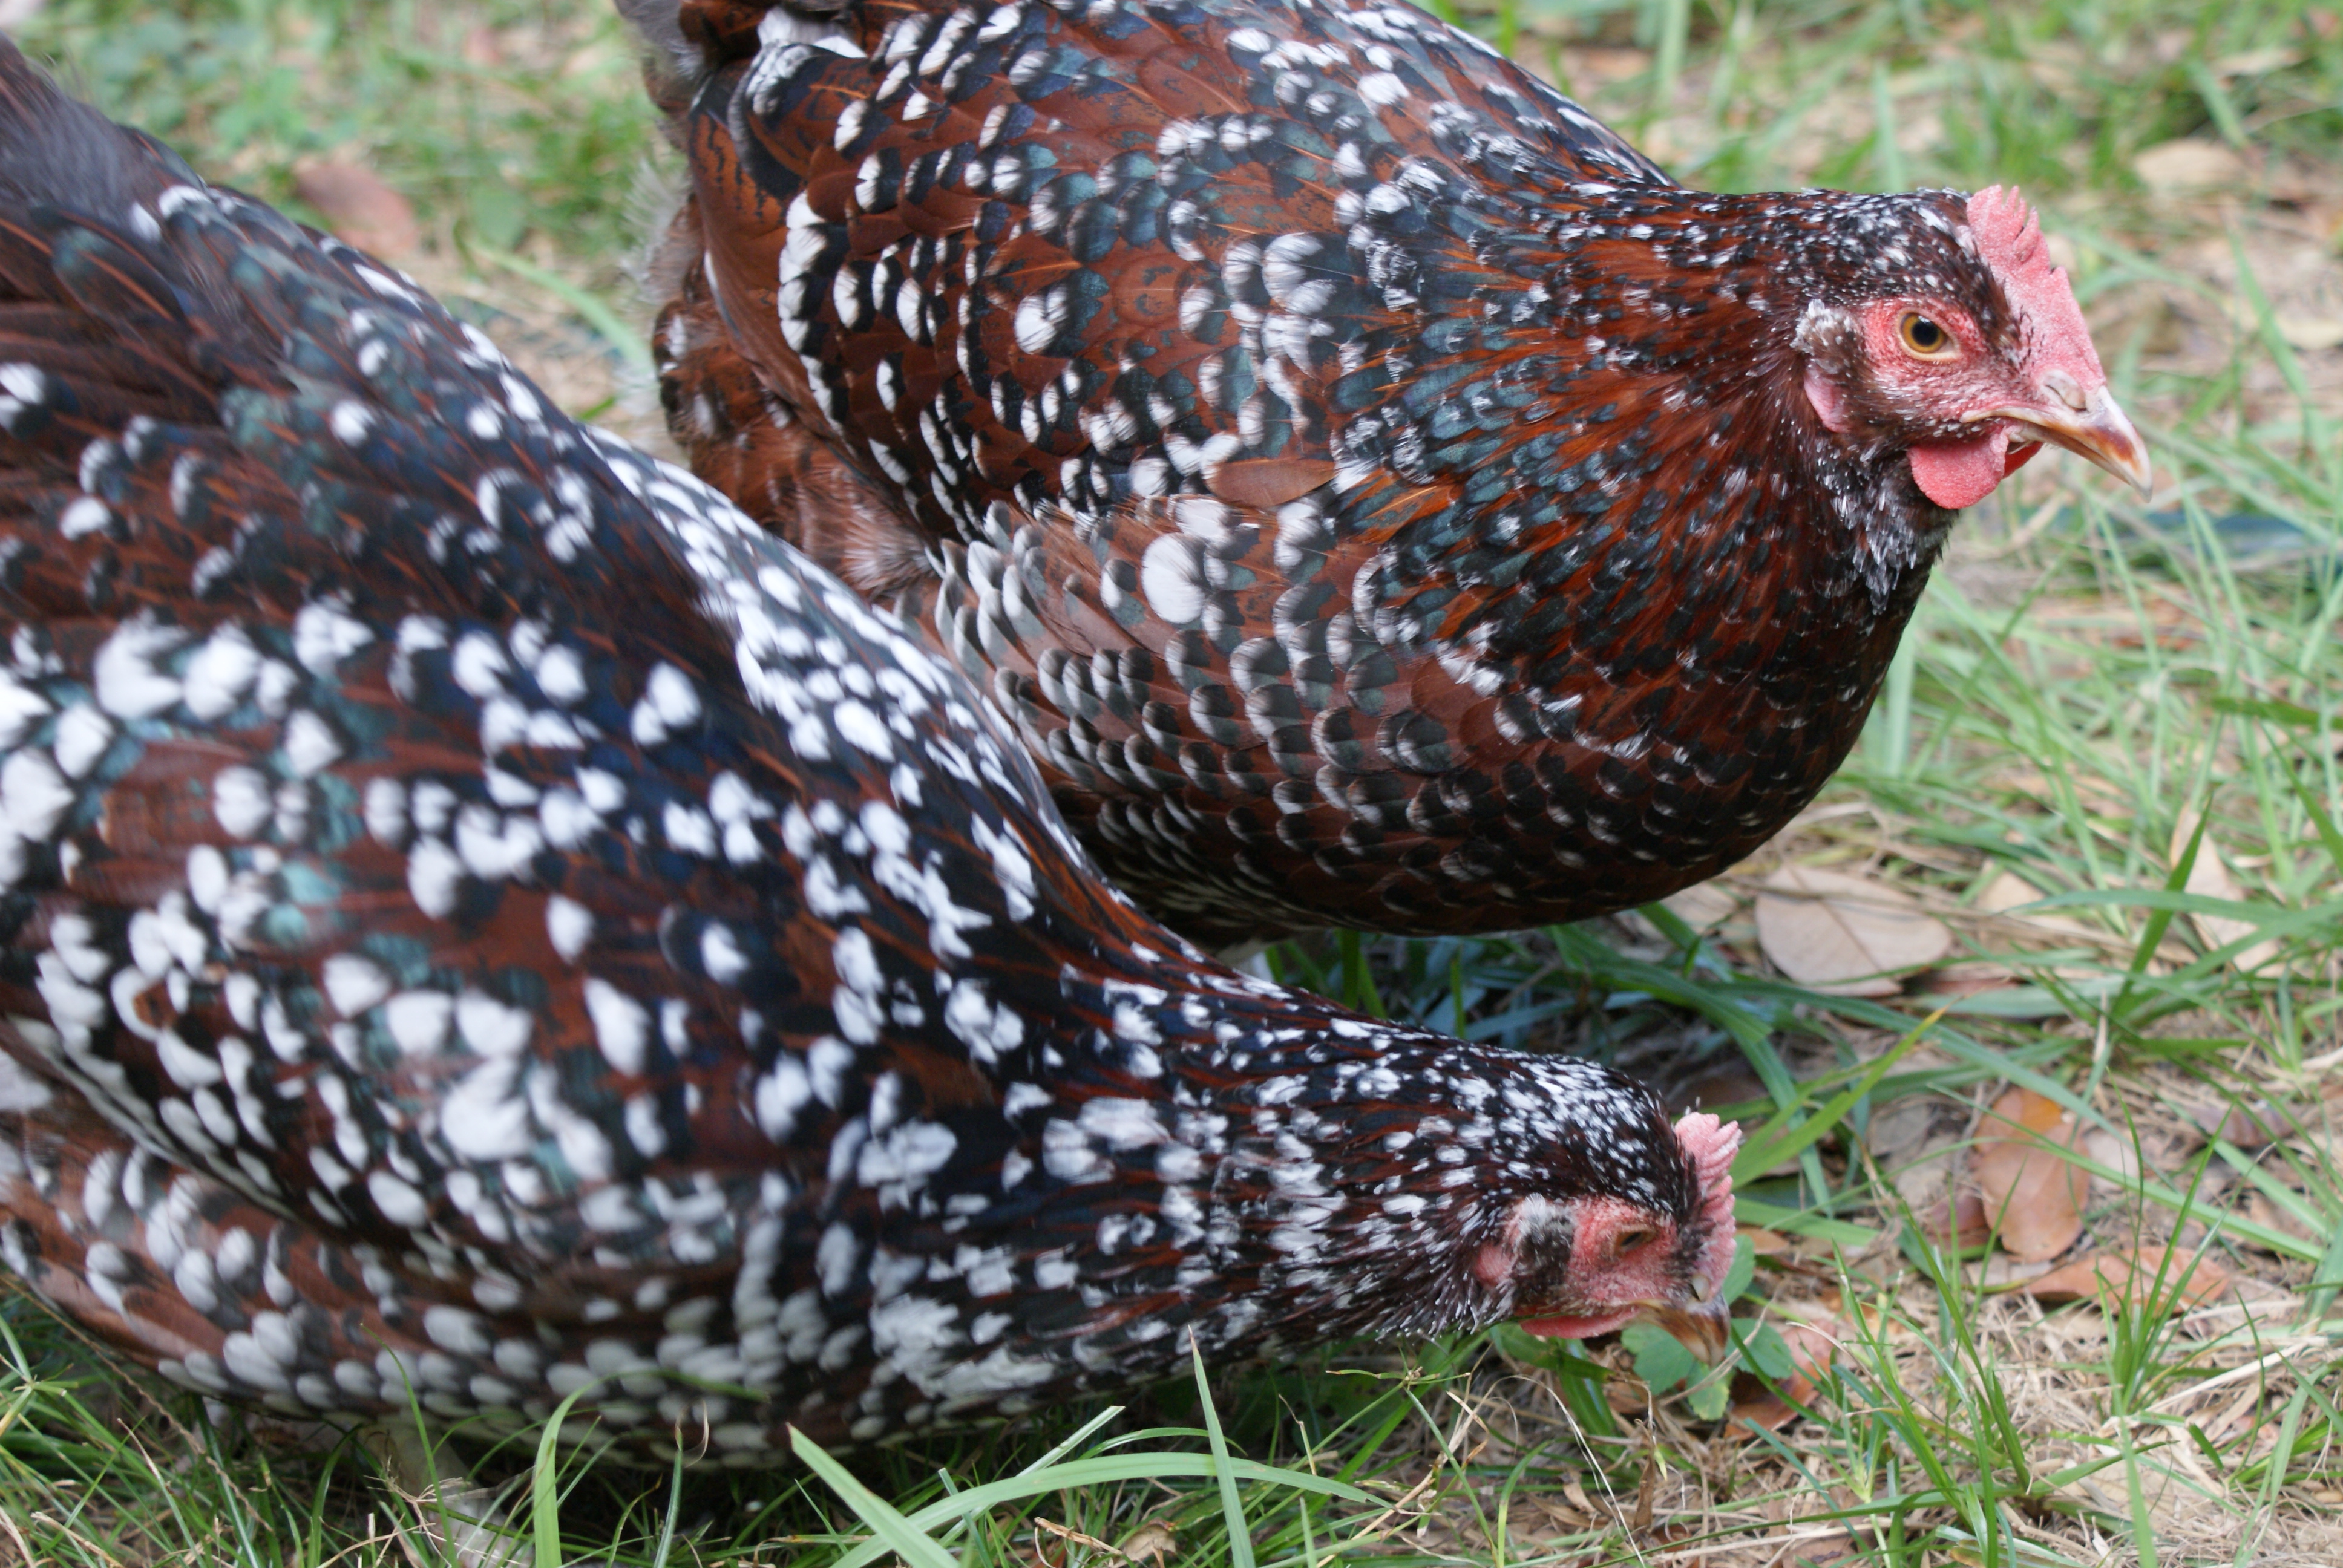
Speckled Sussex.
Credit:Shooting Chris Permission: CC BY-NC 2.0
Sussex

Eggs: Good stock can lay 200-220 eggs in a year, but some sources may lay less.

Personality: Curious, calm, and friendly, this bird is ideal for a small backyard flock and pets.

Care: Good broodies, and tolerate low temperatures. They can be kept confined but love to free-range or have a large run. Otherwise, they are very easy to keep.


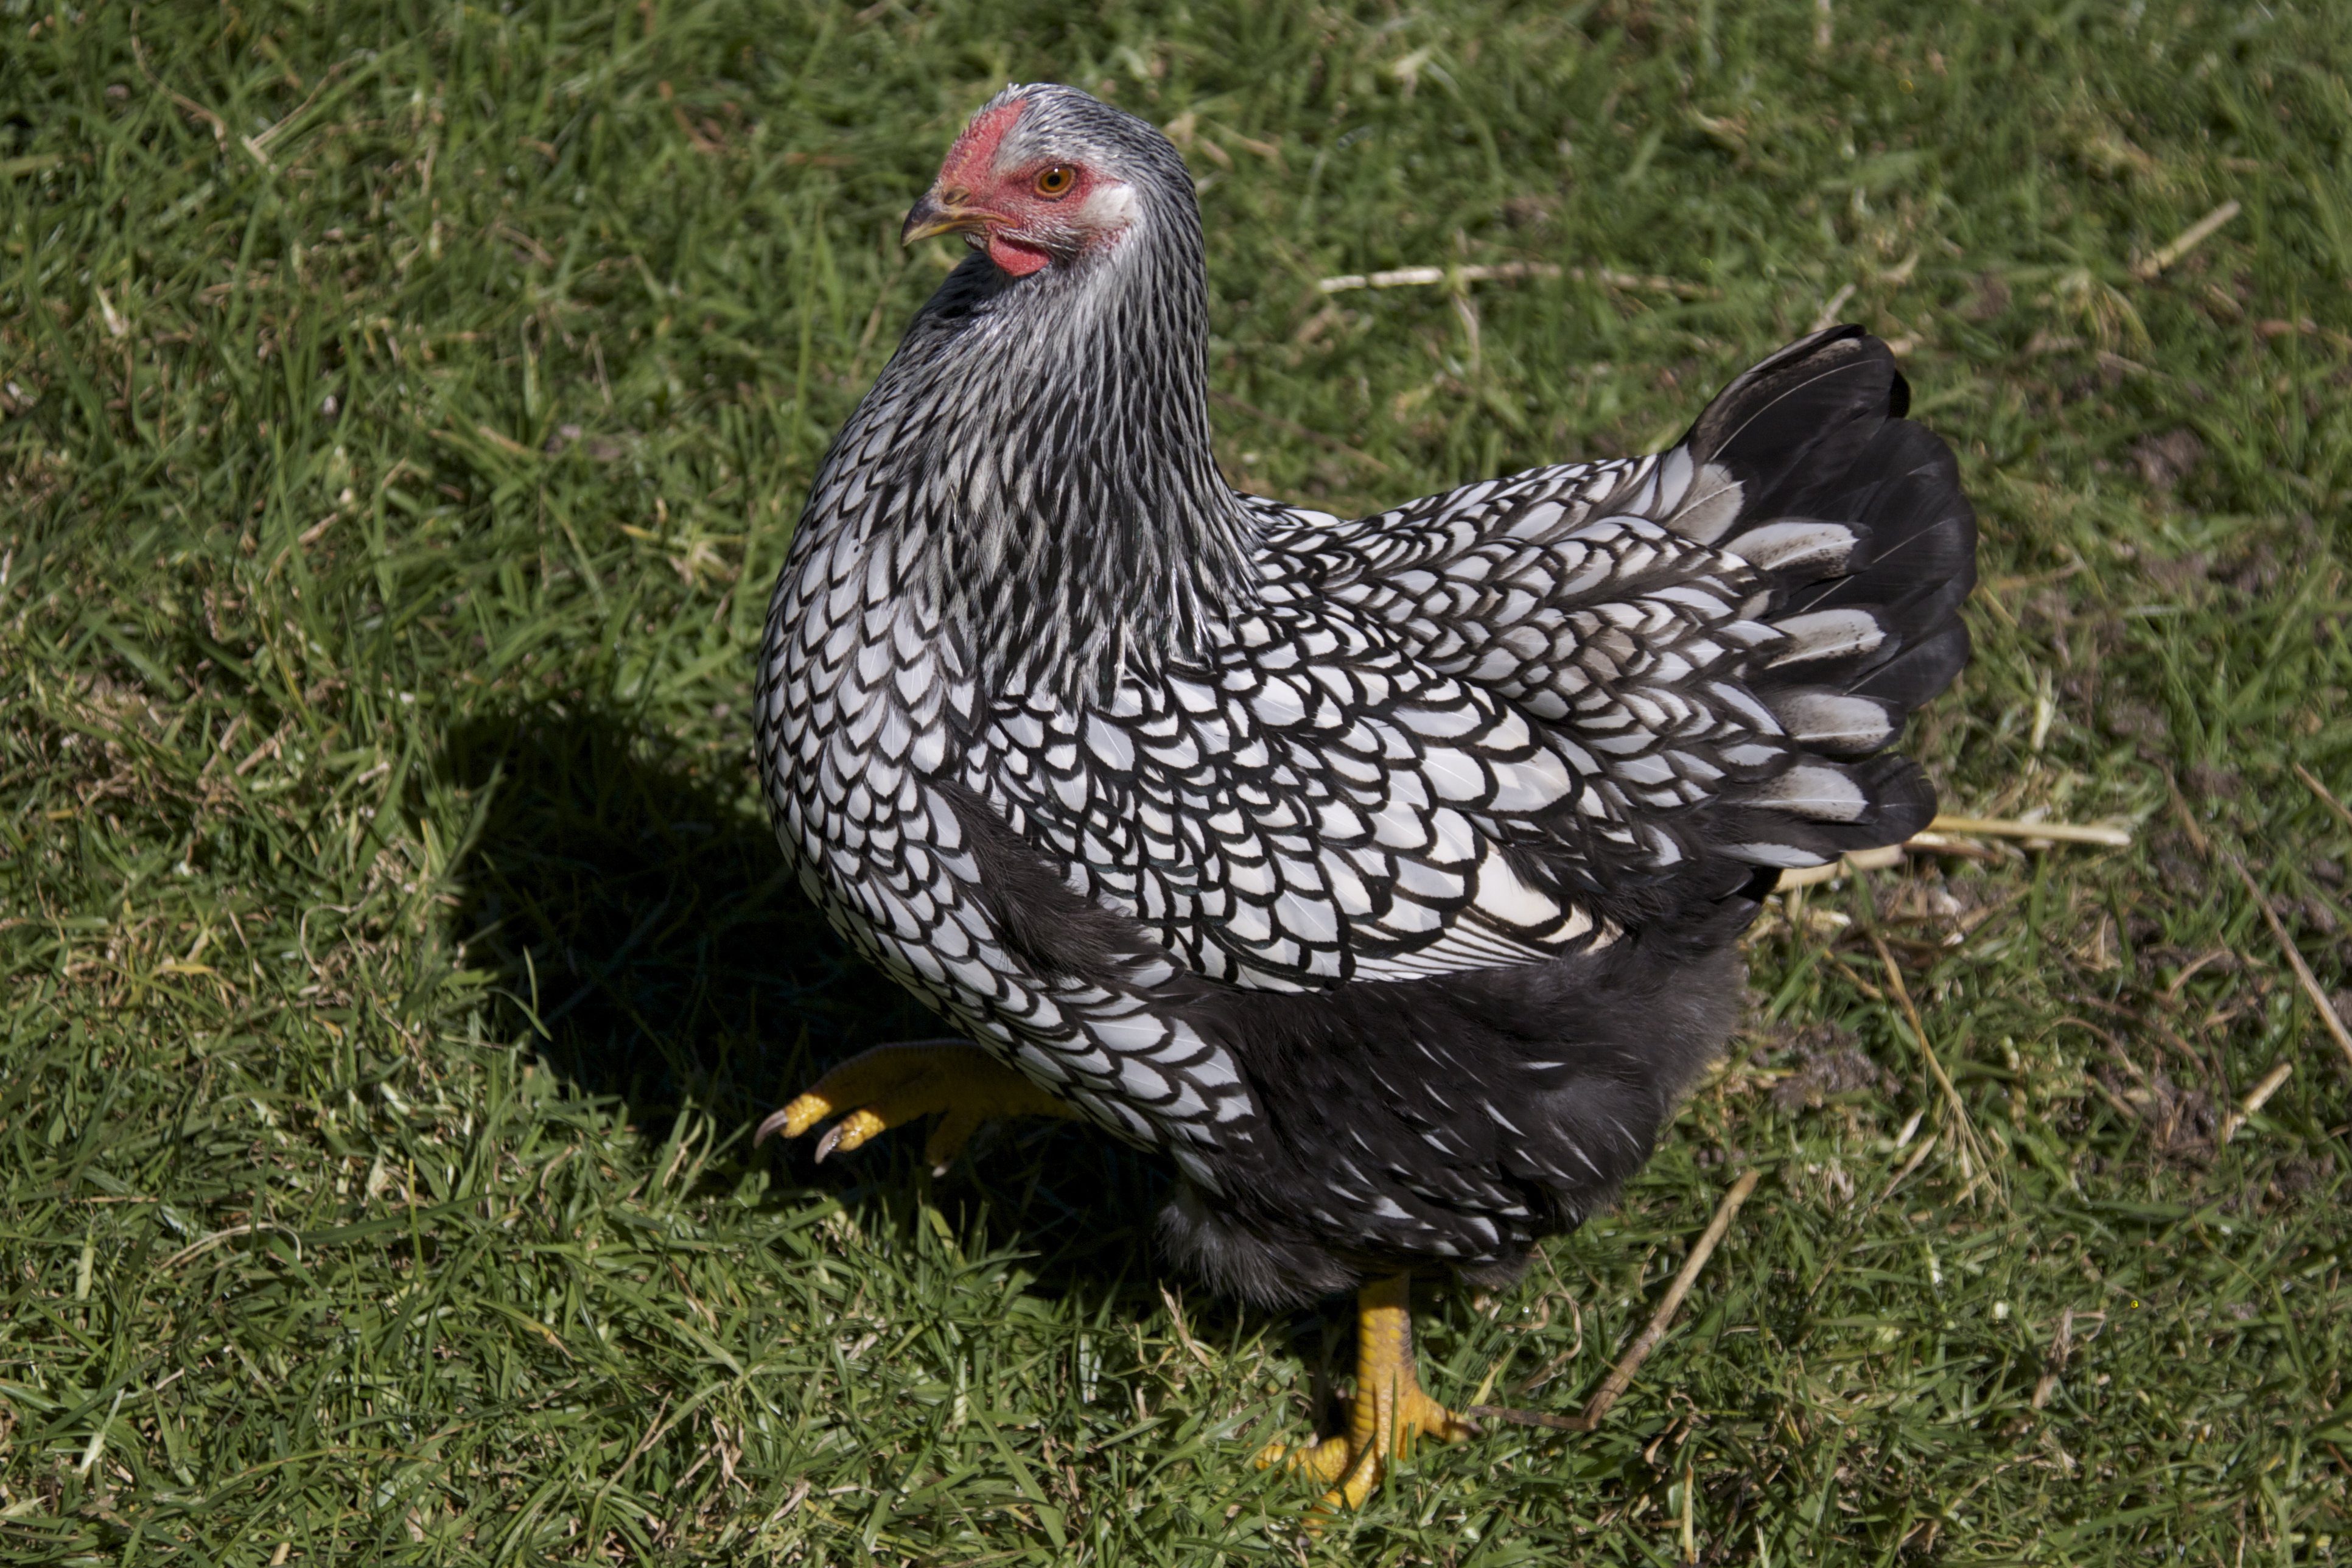
Silver Laced Wyandotte hen.
Credit: cskk Permission: CC BY-NC-ND 2.0
Wyandotte

Eggs: Hens lay 200 or more eggs in their first year, and the Sliver-laced variety is thought to be best layer.

Personality: Are happy in confinement or free-range, they are easy to tame and docile birds.

Care: Hardy birds, suited to most climates. Their small rose-comb makes them less susceptible to bullying and frostbite.


Wednesday, 29 May 2013

Updates...

Hi,
I know I haven't written for a while but I've been editing older posts, either which I hadn't quite finished or that I wanted to add to.
Please check them out!


Thanks for looking! :D

Pepper. 
Credit: birdbrain99


Friday, 24 May 2013

Chicken Care: Choosing a Chicken Coop

For happy, healthy chickens it is very important to have a good house for them. This is where they will roost at night and lay their eggs.
My first coop made of recycled wood. 
Credit: birdbrain99


If you follow the points below when building, converting or buying a coop, there is little that can go wrong:

  • Draught-free: Not only will a draught chill them, risking disease, in the winter months frostbite to the comb may become apparent due to cold, draughty conditions.
  • Spacious: Over-crowding can cause so many problems, and your birds may get injured. The coop will also get dirty faster. As a guide line, if you end up buying your coop please check the specification of how  many birds it can fit, and then take away 1 or 2 birds per 4, as the companies often work on smaller breeds or bantams (other chicken keepers recommend this. my own experience: I bought a coop online, it said it could fit 8 birds in, but I've never had more than five in it as there wasn't space on the perches and any more chickens would have had to sleep in the nestbox!)
  • Good ventilation: Despite the fact that I noted above not to have a draughty coop, some ventilation is a must. The best thing would be to have a small wire grid or a few holes just above where the chickens' heads will be whilst they are on the perch, or at the highest point where the roof meets the sides as this is where most of the foul air will gather.
  • Dry: There should be no way for water to get in, or condensation to build up: if you see condensation, more ventilation is required. The coop should not get damp either. This last problem can be prevented if the coop is raised off the ground.
  • Easy access: This includes both you and the hens. You will need to be able to access the coop for cleaning,collecting eggs and checking on the birds.
  • Easy to clean: Most things in the coop - such as the perches - should preferably be removable so that the coop can be maintained responsibly. There should be a large, secure access door to clean the main coop.
  • Secure and Predator Proof: There should be some way of locking both the human and chickens access doors, even if it is just a simple hook or bolt. The coop must also be predator proof, or you may find just a pile of feathers in the morning!
  • Insulated: This is not necessary - most coops aren't insulated - but if it is at all possible, particularly if you live in cold climates, it would be favourable.


Buying a coop.

There are a wide range of different coops on the market. Which one you choose in the end is up to you. However, your choice should be based primarily on the health and well-being of the birds. Of course, it's great if you can get a coop which is also pretty! It may be a much cheaper option to make your coop at home, and it can also be exactly how you want it then too. However, if you're not very handy, or don't have the time, a ready-made coop is a great option.


Converting  Existing Buildings

Have you already got a shed or out-building? Well, it may be a lot cheaper and convenient if you could just turn that into a chicken house! Most building floors are suitable, such as wood, brick or tiles, but do be aware that if you have a soil floor you will need to think carefully about predator-proofing, damp and cleaning. Just follow the points above, and there are unlikely to be any difficulties.

Building your own.

Another option is to build your own. My first coop was made of old pallet pieces that we collected from saw mills and recycling centres - completely free! If you don't want to design it all yourself, just search around and you can get plans and measurements of other people's coops, and all you have to do is nail the wood together!


 Left: Nest boxes, accessible from outside and with removable wall for cleaning.

Right: inside showing perch, window and nestboxes. 


Plastic, wood or something else?

You may have heard of a relatively new chicken coop called an 'Eglu'. It is a popular option in recent years, made of plastic. Many people think they are the best coops, and they are easy to clean, but some of the information from the company who sell them is misleading, and they are very small and without a proper perch or nest box. However, they do have an advantage because they are made of plastic so there are no crevices, slits, etc. in which Red Mite can hide (Check out this article). There is also the environmental issue. Plastic lasts forever, creating more litter where as responsibly-sourced wood does not. Many people do think they're easy to use, though.
There are also other plastic coops, and even ones made out of recycled materials which could be another option.
If you are planning on a more traditional look, made of wood, you might find it useful to place some lino or something similar on the floor for extra-easy cleaning. Check regularly for mites, and treat the wood with a pet-safe wood treatment.

Saturday, 18 May 2013

Stories or Problems: Common Mites and Lice that Infest Chickens

Here is a list I've made up of the most common lice and mites you are likely to find on chickens, how to get rid of them, what to look for and how to prevent it.
The most important places to look for the different mite and lice species.
Credit: birdbrain99

Common Name: Scaly Leg.

Type: Parasite.

Look for: Up turned leg scales. Apparent discomfort and excessive "preening" of the legs. Limping (in bad cases).

Caused by: Scaly leg is caused by microscopic mites (called Dermatoryctes mutans) which burrow in to the skin between the leg scales. They produce white crusts which force the scales up and cause discomfort for the affected birds. These mites are also called Scaly Leg Mites.
If this problem is discovered early and treated quickly then it is a very simple matter to sort out. However, if it is discovered much later on then it is slightly more tricky, and if it is left then the affected bird will have severe leg problems and will become lame.

Treatment/Prevention: I found this problem at the early stage when it was hardly noticeable, so I came off lightly. I treated it with Benzyl Benzoate which I got from the chemist but it is also available at some vets. There are also special 'Scaly leg treatments' which you can get at farm shops. Benzyl Benzoate is often used on horses, but the lady at the chemist asked if it was for our faces! "No," we replied, "it is for a chicken's legs." She gave us a rather quizzical look...
Soak the chicken's legs and paint on the Benzyl Benzoate which should look like a kind of cream. Use a fine paint brush for this. I repeated it every few days for a couple of weeks to make quite sure it was properly solved and have had no more problems with it yet. However, scaly leg is highly contagious so it would be a good idea to separate the affected birds and treat all the chickens even if they haven't got it. It is also advisable to thoroughly wash the coop as well and move the chickens on to new ground, but I was unable to do this and I solved it so it is not necessary, but it does take more work and is less likely to be quite so thorough if you don't.
Vaseline or Petroleum Jelly can also be used: rub this onto the legs after cleaning them, then wrap in a bandage so it doesn't rub off. This will suffocate the mites, but in my experience is not as affective as Benzyl Benzoate.


Common Name: Northern Fowl Mite.

Type: External Parasite.

Look for: Matted, wet or greasy looking feathers. Dirty vent feathers. Pale comb. Scabs around vent and under feathers.

Caused by: Northern Fowl Mites are 1mm long mites that live entirely on the birds. Unlike red mites, they feed on the chicken's blood day and night and stay on the birds. They are brown, red or black in colour and quite round-looking. You may see them scuttling around on the skin or feathers. They cause irritation, blood loss and anaemia.

Treatment/prevention: A monthly dusting of a suitable anti-mite dust or spray should hopefully prevent the problem, but if you do notice any mites increase frequency to every few days. Treat the birds as well as the coop, paying particular attention to the vent area, under the wings and neck. Remember to treat the crest if your bird has one too!
PLEASE CHECK ALL YOUR BIRDS FOR MITES as they seem to prefer some birds more than others. I have never found a single mite on Daffy or Pepper, for example, when at the same time there have been a few on Nutmeg and Bonnie. If I had just checked Pepper and Daffy I would have said that none of my hens had any mites, so all birds should be checked.

Common Name: Red Mite.
Red Mite (Dermanyssus gallinae).
Credit: Luis Fernandez Garcia Permission: CC BY-SA-2.5-ES
Via Wikimedia Commons


Look for: Red Mites actually live in the coop itself. They come out at  night to feed on the blood of the birds while they are on the roost, so are quite difficult to spot. I check every night for signs of them, just flash a torch around the coop walls and on/underneath the perches. In bad cases, your chickens may refuse to go into the coop to roost, spending the nights outside.

Caused by: Small mites, similar to northern fowl mites, that live in the coop. They are called Dermanyssus gallinae.

Treatment/Prevention: Sprinkle some anti-mite powder along the roosts and in the bedding, and along any shelves, crevices, etc. regularly. Don't use long straw, as they can hide inside the pieces.
If you notice any signs of red mite, move your birds out of the  coop and treat with a proven anti-mite spray or powder. Hose down the coop, scrub and clean, then disinfect with an anti-mite spray or bleach solution. Wait until it is properly dry before reintroducing your birds, and treat the coop frequently afterwards.

Common Name: Poultry Lice.

Type: External Parasite.

Look For: Excessive preening. Easier to spot than mites, can be found clustered on feathers or crawling on the skin. Egg clusters on vent feathers can be spotted by parting the feathers near the vent. Eggs look like white blobs attached to the feathers. Also check under wing for adults and eggs.

Caused By: There are about forty to fifty different species of lice that can affect chickens, but they can all be treated in basically the same way. They are straw-coloured insects that don't actually suck the blood of the birds, but eat the dead skin and feather shafts. However, they can be just as irritating as mites!

Treatment/Prevention:
Similar to Northern Fowl Mites. Sprinkle a good quality lice powder under the feathers, paying particular attention to the vent area and under the wings. They live entirely on the chickens. If you notice a lot of louse eggs (nits), bathe the affected hen with a mild pet or baby shampoo, and try to loosen the eggs to coming off. Careful not to pull, as this will hurt the bird! Otherwise, you can rub Vaseline/petroleum jelly over the eggs. This will smother them and they will eventually fall off, but I haven't found this quite so effective as directly removing the eggs.


Wednesday, 15 May 2013

Information: How to fox-proof your chicken run.


There are various ways to fox-proof your chicken run. The one you choose in the end depends on how much space you have, if your run is already built, and your budget. Here are a few I know of, explaining how to stop foxes digging under. However, they can also climb so either covering your run with wire, a solid roof or fruit netting is a good option, and will also protect from hawks. Otherwise you could run a bit of electric fencing along the top of the fence. This will not protect from hawks though.

1. Basically just use small chicken wire, tacked to the bottom of the run (what I did for my bantam run) to basically make a wire floor. This doesn't really work if you plan on having a tractor (movable run) because they can't scratch or dust bath, but it is good for small, stationary runs because you can put woodchips/shavings/etc. over the top so that they can scratch. It must be one of the safest options. but can only be used for small runs, before it becomes very expensive.

Using a fox-proof "skirt" around the chicken coop and run.
Credit:  Moosicorn Permission:  CC BY-NC-ND 2.
2. I use this for the large fowl run. Attach wire to the side of the run near the floor. Then bend it so that it sticks out at the side for a little over a foot (not on inside of the run). If the wire isn't stiff you'll need to put  some soil over it and hold it down with a few bricks/stones or tent pegs. Obviously the run has to then be stationary, but you can also move it around if you use tent pegs to hold the wire down. This creates a kind of "skirt" around the base of the run, and is a good option for large, stationary runs.

3. Paving: this is another option. You could lay slabs down or concrete and place the run on top. There will then be no way for the fox to dig underneath. Then lay something down on top for scratching in. If you do want to move the run around then you could do so, and just put it on the slabs if you go away so your "chicken-sitters" don't need to worry about foxes!

4. This is similar to no.2, but instead of pegging the "skirt" down, you dig the mesh vertically into the ground, before filling it in. I've never tried it, but it is a very safe option.

5. You could try electric fencing, or an electric wire running along the bottom of the fence and again another one at the top, but it wont be as safe as the others.
Secure chicken run on slabs.
Credit: David Clegg Permission: CC BY NC-SA 2.0

The only time you really need to worry about fox-proofing is when you are away or if you don't want to lock them in and let them out of the coop twice a day. However, foxes do come out in the day, particularly if you live in an urban area where they won't be as shy. If you can, you might as well make sure your birds are safe from foxes and other predators also!

Monday, 13 May 2013

Chicken Care: Daily Routines


Why?

Your chickens benefit greatly from a daily routine, as they
 are creatures of habit.
Credit: birdbrain99 (Author)
It is really important to establish a daily routine with your birds. Chickens love order and are very habitual. They like to know what-happens-when, and it is good also for you. A daily routine is made based on you and your hens' needs. It should be reliable and realistic.


What do I need to do on a daily basis?


This reallly depends, but the most you'll need to do is:

  1. Check for eggs
  2. Spot clean coop
  3. Fill up food hopper
  4. Check water
  5. Feed kitchen scaps/greens/corn
  6. Lock them up at night
  7. Let the out in the morning

What do you do?


I do all the above.  A routine will come naturally once you have had your chickens for a while. Here are my basic chicken jobs timetable for the summer, though. It starts at 06:30 am - 07:30 am.

Early Morning: Let hens out. Spot clean the nestbox (Bonnie sleeps in one at night so I have to clean it before they lay otherwise the eggs get soiled). Bring up/check water. Scatter a jar of mixed corn around the runs ( I feed a little under a jar for six hens).

Mid morning: Fill up feed hopper (there's usually some pellets left over from the day before so there is food when they come out the coop first thing.)  Feed any greens. Check for eggs.

Early afternoon:  Spot clean the rest of the coop. Give any kitchen scraps. Another egg-check.

Evening: Lock them up in the coop for the night. Check water/bring down if needs cleaning to return in the morning.
I will often then go up throughout the day just to see them.


What if I'm away most of the day at work/school?


 If you aren't at home most of the day, like me, then you can easily do it all in just a couple of trips, one morning and one evening. Such as this:

Early Morning: Let them out. Spot clean coop (though this isn't necessary: you could use a deep litter system so you need to clean much less often). Fill/check food and water. Give them any scraps.

Evening: Check for eggs. Lock them up. If you're back early enough then maybe you could feed them extra treats now.

Less Frequently.


As well as everything you do daily, there are things that need to be done weekly, monthly and yearly also. These include:

  • Cleaning out coop - which I do every couple of months, but if you do a deep litter system you'll only have to do that a couple of times a year.
  • Disinfect and wash the coop. This needs doing once a year, unless you've had problems with red mite or illness.
  • Clean Feed hopper. This needs doing less frequently than water. I do it every month or so (read about it at the bottom of this post); depending on how large it is, how many chickens you have, how much food you put in and what feed you use.
  • Health check. It is good to do this every few days. I will write a post about this soon, and add a link here when I do.
  • Treat for worms and mites. Treat for worms a couple of times a year but some people don't bother at all unless they see signs. The only product I would use for worming is Flubenvet as it is the only properly tested product. Do Not use Verm-X because it killed one of my hens which would still be alive and well if I'd used Flubenvet (long story)!
  • Replace run litter. Depending on what you use (another thing I need to write about), it needs to be replace once to four times a year.


Notes.

Don't let them out really early some mornings, and then later other mornings. They are likely to start shouting when they aren't let out early and can disturb neighbours/you/your family!!

If your birds are partly free-range it is good to also set up a routine for when they will be allowed to do this and for how long.


Sunday, 12 May 2013

Information: Broody hens

What is a Broody?

Adjective: (0f a hen) Wishing or inclined to incubate eggs.


Meaning that a hen, when she feels that she has sufficient eggs to hatch, will attempt to hatch the eggs. She will lose the down feathers around her breast area, which are very insulating; this way she can transfer enough heat from her body to the eggs to hatch them. Checking the brood patch is a good way to tell if the hen is definitely broody.  A broody hen is sometimes called a clocker.


Nutmeg my broody bantam hen.
Credit: birdbrain99 (Author)


Signs of a broody hen are:
  • Sleeping in the nestbox instead of perching.
  • Clucking when you come near.
  • Sitting in the nest most of the day.
  • Looking fluffed up and flat whilst on the nest.
  • When placed away from the nest, will keep her wings and even tail spread out before going back to the nest.
  • She may peck you if you go near to the nest, or to collect the eggs.
  • Brood patch (feathers missing from breast area)


My bantam, Nutmeg, is currently broody. However, hens may not even sit on any eggs when they become broody: they may sit on golf balls, small stones, or she may not even sit on anything! Nutmeg is currently sitting on a golf ball and an old egg. I believe I stimulated her into becoming broody by keeping the golf ball in there (it was in the nestbox in the first place just to show them where to lay, and I never got round to taking it out) She must have felt she had sufficient eggs to start a nest (I believe she had two eggs and a golf ball when she started). 


In this video, I take out the golf ball from under her. She quickly moves it back under to keep it warm.      


Bantam hens can sit on about six eggs, whereas Large fowl can sit on up to 12 eggs. Bantam eggs take less time to hatch (about 18-20 days) than large fowl eggs (about 21 days).


Caring for a Broody Hen and her Eggs.

Some hens may not come off the nest much at all during the incubation period, and will lose condition whilst sitting. You should take her off the nest once or twice a day so that she can eat, drink, exercise and relieve herself (they do not like to soil the nest). She may even appreciate a dust bath.
 Don't be at all surprised if she loses condition and weight.
 If you plan on hatching eggs under her, be certain that she is very broody as she may otherwise give up halfway through. If you do plan on hatching eggs, it is recommended that you separate her from the other hens in a specially designed broody coop. This coop should have a wire floor and is rested on the soil, with bedding such as straw on top to make a comfortable nest (it is not recommended to use hay as bedding because it can carry harmful bacteria or fungi.) This allows enough moisture to reach the eggs from the soil. Another option is to sprinkle the eggs lightly with a few drops of warm water once a day (best in the evening).
 A rabbit hutch, dog crate or anything to keep her separated can work instead of a specially designed broody coop.
 To move nests, just take the eggs she was sitting on, place them in the new location,  place the hen on the new nest then keep it dark for a day or two so that she is settled once more. She should hopefully settle and stay broody. If not, then she is unlikely to be a very good mother anyway. 

If any eggs do get soiled, it is important to clean them. Use a wire brush or scourer (careful not to damage the eggs) instead of washing them (this removes the protective layer of the shell, allowing harmful bacteria to get in.)
                                             
You will need to pay particular attention for mites and lice whilst you hen is broody, because:

  •  she can lose condition more quickly
  •  it can irritate her, resulting in abandoning the nest
  •  the mites and lice will pass on to the chicks, and can then result in death                               

To prevent this, frequently dust her with a mite or louse powder, as well as a little in the nestbox itself.

 Do not disturb her or the eggs on the last couple of days before hatching. Place a shallow dish of water and chick crumbs next to her for when the chicks hatch.


Breaking a broody.

So you don't want her to be broody? Fair enough if you don't want her to hatch eggs. In fact, despite how protective and cute she looks whilst broody, it is best to "break" her, as it's called, because she will lose condition whilst broody.Even if you do manage to break a broody, she will likely become broody again at some point.
The best way is to make her as uncomfortable as possible, really. The most frequently used method it to place her in a wire bottomed cage without bedding in a light, sheltered place raised off the ground for a couple of days. Remember to give her plenty of food and water!! Once she has been in this contraption for a couple of days, release her back with the other hens.
Remove the eggs as soon as possible (checking at least once or twice a day) to try and prevent her from going broody again. Of course, there will be cases when she goes broody even if there aren't any eggs. 

Common Breeds that go Broody.

There are some breeds that go broody more than others. These include:
  • Silkie
  • Wyandotte
  • Sussex
  • Orpington
  • Pekin bantam
  • Cochin
  • Barred Rock
  • Sumatran
  • Japanese bantam
  • Scots Grey
  • Scots Dumpy
  • Maran
  • Faverolle
  • Old English Game - this breed is unique in that it is the only breed in which a male may help with the rearing of -and may even take over- the brood.
Of course there are exceptions (my Sussex hens have never gone broody), but the general rule is the heavier, docile breeds are more likely to go broody, whereas the flighty, light breeds are not going to be such good broodies and mothers. If you really want a very good mother your best option is to get a Silkie. 
If you want lots of eggs, choose one of the Hybrid breeds or not such good broodies.

 Some of the not so good broodies are:
  • Leghorn
  • Hybrids - most hybrid breeds have had the broodiness bred out of them, to increase egg prodution.
  •  Lakenvelder
  • Campine
  • Welsummer
  • Hamburgh
  • Rhode Island Red